…a few years later

I remember when we discussed the idea for this blog, many years ago.
In the end we did not write many posts here but on the bright side I ended up working with Jetbrains MPS on daily basis.
On my blog I wrote a set of tutorials and other articles on MPS and I founded a consulting company that build DSLs using Jetbrains MPS: it is called Strumenta.

So while this blog did not end up having a big success, MPS ended up playing a nice role in our lives. No complaints there 🙂

A simple Robocode language

Some days ago, to make the MPS community a little bit more visible, I started the MPS Robocode contest. I thought it would be a good idea to use the latest versions of MPS and robocode. Well, living on the bleeding edge with newest versions sometimes brings some adventures. Building a robocode robot with MPS EAP/RC and running it in robocode may be not as straight forward as one may think (and as I experienced last time with versions MPS 2.5 and robocode 1.7), so I’ve created this little tutorial for some explanations. Btw: I used MPS 3.0-EAP-129.189 and MPS 3.0-RC1-129.257.

If you are bored by the details and just want a starting point, you may also just clone this repository and read the section about how to start and run robocode.

Preparations

First, lets start with some standard preparations:

  • download robocode from sourceforge
  • follow installation instructions
  • see the Getting Started page to get an idea what we want to do
  • create a new MPS project, let’s call it ‘robocodecontest’ with language and solution
  • in the solution, create a model with name ‘sample’
  • add a git repository: in MPS menu, use VCS/Import Into Version Control/Create Git Repository
  • on the filesystem, add a .gitignore file with some content as in this sample (because we dont’t want generated code in the VCS)
  • from robocode install dir, copy libs/robocode.jar into your MPS robocode project, solutions/robocodecontest.sandbox/lib
  • download robocode source
  • create directory in your MPS robocode project, languages/source and copy robocode.api into languages/source
  • Change from ‘Logical View’ to ‘Filesystem View’
  • mark solution, language, mpr, and .gitignore, from context menu choose Git -> Add
  • use Ctrl-K to do the initial commit
  • got back to ‘Logical View’

Now we have created the MPS project, have the dependencies in place and can start with coding.

The Language

What we are aiming for? Please have a look at the My First Robot tutorial. There are two methods:

  • run contains the main loop while(true){…}
  • onScannedRobot which is what to do when our robot detects another robot

Hm, how can we get a class like this? There are two fundamental approaches:

  • extend Java so that there are new statements for ahead, turn, back, fire, and so on and create our robot in Java, means we take a ClassConcept as root concept and write our code in Java
  • do not directly use Java but generate Java code instead

To get rid if the unnecessary syntactic clutter and have a nice clean language with own syntax: let’s choose the second option.

We need a few concepts for ahead, back, turn gun right x degrees, fire for the actions – and the robot as root concept.
All actions implement an interface IAction and the robot has two collections of IAction as children for the main loop and the onScannedRobot method. All is pretty straight forward. Now we can already create a robot in the solution model ‘sample’ and see how it looks like.

mpsrobocodecontest1

A generator

In language context menu, we add a generator. In this generator we depend on the robocode API. Normally we would add the jar file as a library and let MPS create the stubs for accessing the classes. This has two drawbacks:

  • you cannot jump to the source and see the implementation
  • it doesn’t work (yet) with 3.0 EAP

But there is a second option. We create another solution, name it ‘robocode.runtime’ and do an ‘Import Model from Java Source’ of the robocode API. Now it’s also easy to read the robot code if we want to understand what’s going on.

mpsrobocodecontest2

Because we have also the robocode classes in robocode.jar and the API alone doesn’t compile, we have to check the “do not generate” checkbox in in robocode  Model Properties, Advanced. But for compiling the solution, in the solution module properties on the other hand we have to add the robocode.jar to as a library. We are nearly done with preparations for the generator, just let’s import the robocode model from robocode.runtime solution in the generator model and in generator module properties, tab Depenencies, check Export on JDK because we need the JDK for compiling the solution to Java class files.

Well, the was more preparation as guessed in the first place. But the implementation of the generator is again pretty straight forward. Just create a Java class as root template and some reduction rules for the actions to call the methods from robot.

mpsrobocodecontest3 mpsrobocodecontest4

Now we can build the solution. Due to some strange classpath bug in version 1.8, robocode only finds robots with no package (which could not be done with MPS because the model name is always the package) or with already existing packages. In version 1.7, it worked as described in robocode wiki and one could add the classes_gen directory in the development options. Now as we use robocode 1.8, go to classes_gen dir and copy the robot class from sample the class-file into robocode install dir/robots/sample.

Run robocode

With this good preparations, running robocode and see your robot in actions is simple:

  • start robocode as a Java program and be sure to add the directory where your MPS puts the compiled classes into the classpath; I’m writing this post on a Windows machine, so the command looks like this: ‘java -Xmx512M -cp libs/robocode.jar;C:/Users/jens/MPSProjects/robocodecontest/solutions/robocodecontest.sandbox/classes_gen robocode.Robocode’
  • in the menu, open Options/Preferences, choose the “Development Options” tab and “Add” also the same directory (C:/Users/jens/MPSProjects/robocodecontest/solutions/robocodecontest.sandbox/classes_gen in my case)
  • open Battle/New
  • Press Ctrl+R for refresh
  • if your robot doesn’t show up, open the console using the “Main battle log” button in the lower right corner next to the battle field and look for error messages
  • select your robot, press Add -> so that it is copied into the ‘Selected Robots’ window, add other robots if you want and press the ‘Start Battle’ button

mpsrobocodecontest5

I guess the little kid in you just awoke you can’t await to play around with algorithms to make your robot better. I don’t want to hold you back, but just one little point before I close:

Put it on GitHub

In GitHub, we first create a new repository. Let’s call it ‘mps-simplerobocode’. Make it public, but don’t create a README or a licence file. This initializes the git repo so that we have to check it out and copy our code into the repo. Without initialization, we can simply add a ‘remote origin’ to our existing git repo and push the code: git remote add origin https://github.com/jensnerche/mps-simplerobocode.git and git push origin master.

Now let me know about your repository and I can fork it. The forked version is the one for the contest.

Conclusion and Lookout

The language part was really easy, I think. The infrastructure part was a bit more tricky. If you don’t want to do it again, you can simply fork  the project from the statet URL and make it better. There is plenty of possibilities:

  • more callback methods
  • give the robot a state to make it more clever
  • checks like ‘not two same moves’ with quick fix ‘combine’
  • custom refactorings
  • integrate robocode playfield as a tool
  • fire: preview the velocity from the power: velocity = 20 - (3 * power)
  • add units e.g. radians and degrees (just like the mbeddr physical units)
  • use floating point numbers for power
  • check that bullet power is >=0.1 and <=3.0
  • use colors in editor
  • an empty IAction for better editor experience
  • comments
  • and of course advanced algorithms to make your robot the best

to name only the most obvious.

Field Report: Executable Gherkin in a brownfield project

Introduction

I took this project as an example for writing a field report because to me it seems a somewhat typical situation: you want to bring MPS into a project, but:

  • in a brownfield project, all stuff is done without MPS until now
  • things are not so easy importable
  • team members don’t know MPS and/or refuse to use it
  • and more constraints exist that don’t let you write your production code with MPS

So is it even possible to use MPS when only here and there has something to be changed? This was the question I was interested in, and the only way to find it out was trying it. The situation was as follows.

An existing EAI brownfield project had to be extended by another integration use case. The integration is done by an integrations server which has to be configured by a proprietary tool. So it was no option to create the ‘productive code’ by MPS, but there were enough tasks left:

  • the requirements were mostly unknown and expected to pop up every now and then, so they have to be analyzed and managed
  • acceptance and regression tests have to be created
  • of course, best would be to combine these two having an executable specification
  • for localization, the property files for every language have to be managed
  • PDF creation is done by Apache FOP, so some support for creating the fo-file would be nice

Until then, we used Scala for acceptance/regression/integration tests.

Choosing a language for executable specification

For formal requirements analysis and management, we have three languages in our repository:

  • the Use Case form
  • the SOPHIST form
  • gherkin

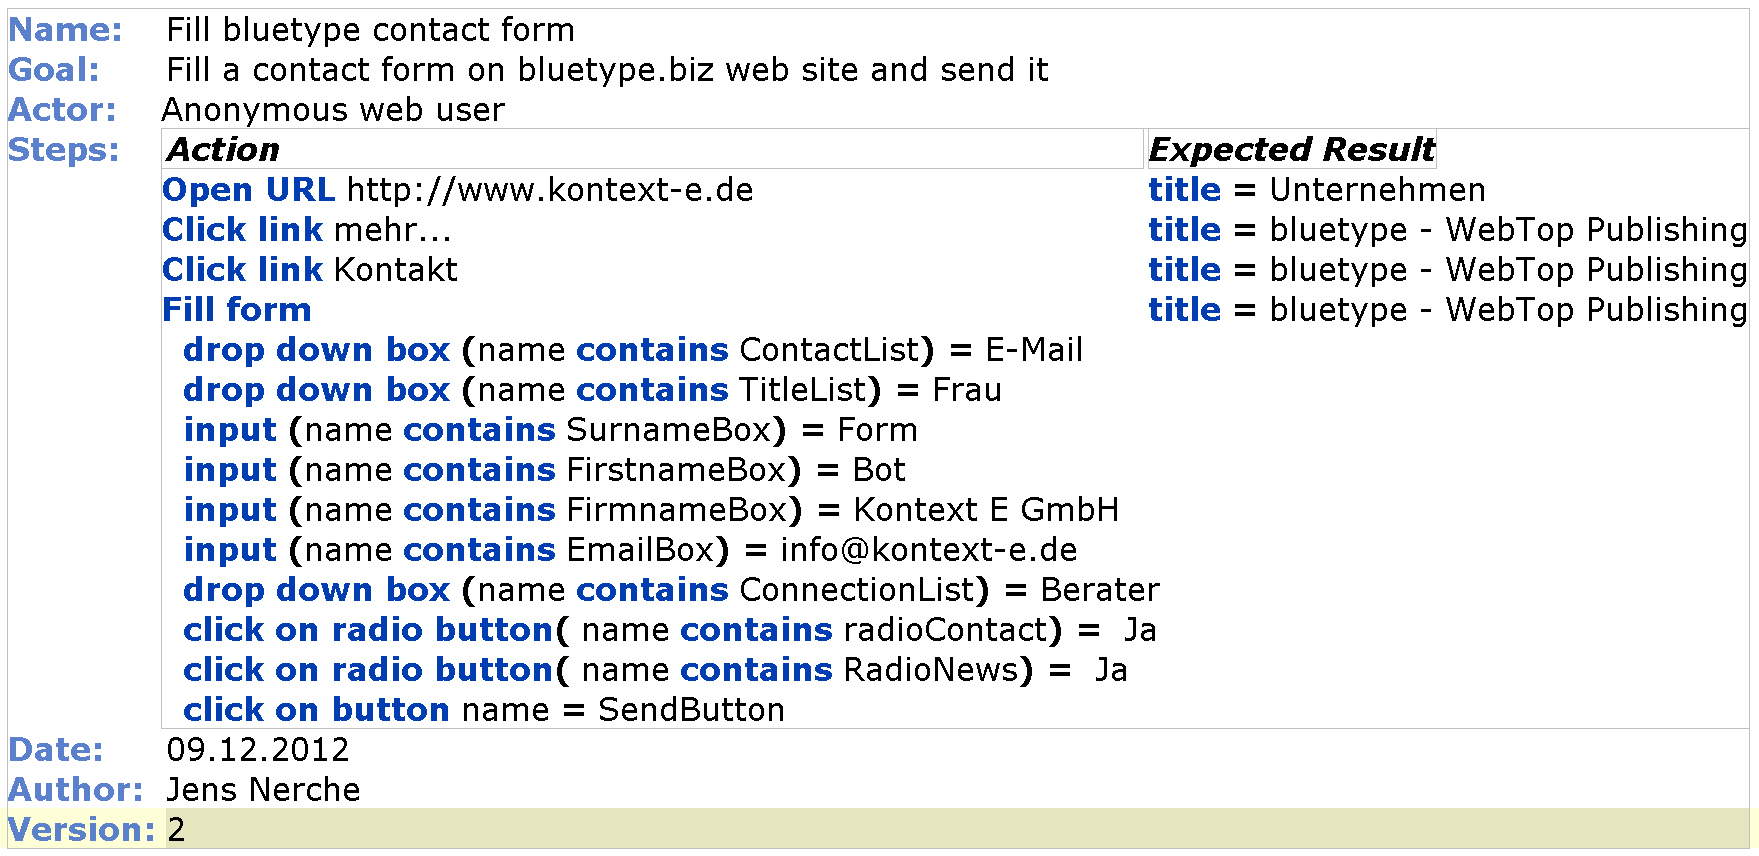
The Use Case form looks like this:

requirements_usecase_en

This is our form to gather details for this what is shown in UML use case diagrams as overview. Here are only the mandatory fields, there are lots of optional fields. In an office document it would be a simple table, but in MPS it is translated into Java code and can be executed.

The SOPHIST form is created by the SOPHIST folks and published in various articles and books. In MPS we have currently no translation to Java code and no interpreter, so it is not executable.

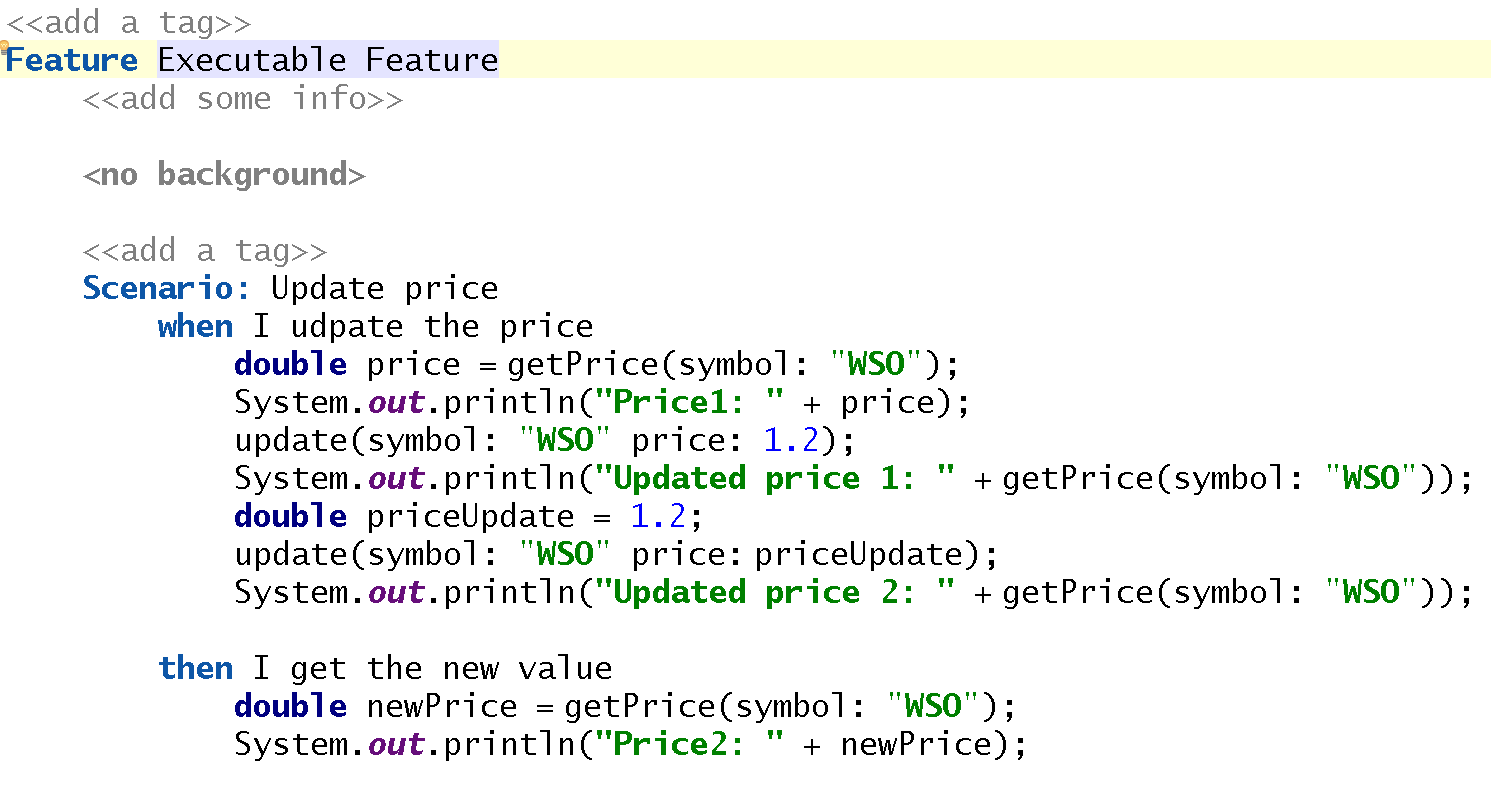
Gherkin in contrast is executable and looks like this:

gherkin_en

You can see some properties of the implementation in MPS:

  • features and scenarios may have tags to filter them
  • scenarios may be marked as pending so that they are not executed
  • some checks exist and report errors to the scenarios
  • steps may be marked as ‘open point’ and were highlighted by the orange background

The meta data of  the use case form like author, date, and version is not needed. Also in this integration case there are no actors.  And there are lots of examples for input,  so the gherkin implementation was chosen.

With gherkin, we have two  flavors. The first was shown above, the second is more flexible and has the implementation next to the scenario step:

gherkin_with_java

Indeed the Java implementations details are hidable, it stays a mixture of two abstraction levels which is not so good. Nevertheless this form is very suitable if there is much experimentation with implementation is needed. And this language could be enhance by a refactoring which creates a language concept and a generator reduction rule for the detail part (maybe named ‘extract concept’ or so, we still have to think about it).

Because in this case the flexibility was not needed and the first gherkin form offers more comfort for creating scenarios, it was chosen.

Including XML

As stated above, there was plenty of examples for input. Looking at them more closely it turned out that only two or three cases were covered by nearly all examples and most cases had no examples. So we had to create the remaining cases  ourself. The examples came as XML files, so we extended the XML language delivered with MPS by some little things. The most visible one is an accentuation of what is special about this example:

example_xml

On an element or attribute, you can attach a reference to the scenario where the description relevant to the highlighted part is. Because large parts of all XML examples are identical and sometimes only one attribute differs, the interesting thing is much easier to find. Not existing yet but very easy to do now is an overview of all XML modifications so that it is easier to find out if all cases are covered or something is missing.

As helpers an XML file importer, an exporter from MPS editor to org.w3c.dom.Document and an XSLT transformer which takes the XML and stylesheet from MPS editors and puts the result also into an MPS editor were created.

Extending Gherkin

Gherkin is a language in the general domain of ATDD/BDD. For the business domain of the project, we extended gherkin.

One extension point of gherkin is the clause of given, when, then, and the others. The original plain text clause may be replaced by other clauses. We defined all for the narrow domain. So while creating or editing a clause, the typical Ctrl-Space-suggestions work. We defined reduction rules for them so that the generator produces the test code.

The test code often references elements and attributes in the XML examples. We added element and attribute references for the g-w-t-clauses. In the specification the data is directly visible, and in the test code can the correct data placed in assert statements. Once we noticed that there is a 1:1 relationship between scenarios and XML examples, the element and attribute reference suggestions could be much more narrow.

Another extension point of the gherkin language is the progress for scenarios. A scenario can be in states like ‘pending’ or ‘done’. We defined project specific states with project specific color codes. That makes it easy to stay up to date with the project progress.

Also another extension point is useful for that: statistics. We defined some to get the numbers of total scenario count, count of pending scenarios and so on.

Although the FeatureSet concept was extended to an ExecutableFeatureSet, for legacy brownfield reasons we generated the Java test code and XML files from our models and executed the tests in an external environment. This also has the benefit that the regression tests can run without MPS.
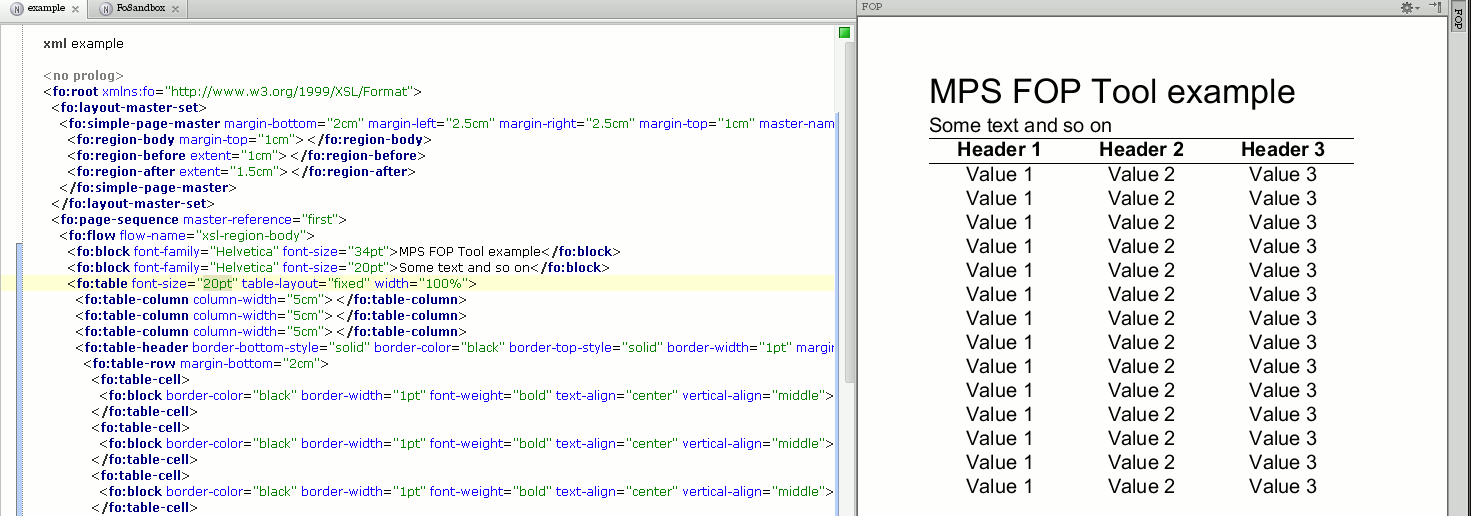
The FOP Tool

One requirement was to create PDF from input XML. To create a template, the first attempt was a roundtrip like this:

  1. do some modifications on the FO file
  2. close the previously opened PDF (relevant on Windows)
  3. transform FO to PDF
  4. open the new PDF
  5. go to 1

This was slow and annoying. But Apache FOP is Open Source. Thus we could create a tool (aka view) that makes template work much more pleasant. In a view it shows the rendered picture of the current editor. The FO processing and picture rendering is done in a separate thread so that the editing is as fluent as without the preview.

foptool

Becoming international

Then the requirement to localize the PDF and other things emerged. Technically no big thing except the pain of maintaining the language property files, keeping them complete and without duplicate keys, having the translations not too long to fit into the boxes and so on. Not so painful with MPS. Only a tiny language is needed. In out case it has a custom persistence to store and load the solutions as CSV files. A domain expert is able to create more language property files using office tools she knows and doesn’t need MPS just for this case.  Some checks and quick fixes take care of keeping all translations clean. And having the language property files as first-class citizens in the project allows a much better integration (referencing, find usages, warn about unused tokens,…).

Not done yet but very easy to do would be to create an ‘L10N’ application based in MPS with only the L10N solution included. So the domain expert could edit the translations while benefiting directly from the checks and quick fixes.

Conclusion

At the end, the team is still convinced that the decision for MPS was a good one. It is easy – even for not technical staff – to create and maintain executable test scenarios. They are much more readable than other kinds of executable specs. Not to mention that the tailored editor is unmatched by alternatives for programming Scala or Java BDD tests.

The effort of building or extending the languages was not as much as suspected. Especially if you take into account that L10N, FOP, and the XML tools are independent languages and easily reusable.

It was shown that even in a brownfield project and where the main code is not accessible by MPS the usage of this language workbench was worth it.

Invitation for the Robocode contest

Do you know Robocode? “Robocode is a programming game, where the goal is to develop a robot battle tank to battle against other tanks”, says the homepage. It’s very easy to program a robot – although you can put any effort in making it as clever as possible.

To program the robot they have a nice API. But it could be done better! Let’s use MPS and create a language for robot control! To make it more fun, I invite you to contribute your language and a solution with this language. All solutions – or to be more concrete: the robots created by this solution – will be put into a playground and battle against all others. Let’s define some rules we hopefully all agree:

  • Your submission should consist of a new language and a solution with this language
  • The solution should eventually compile down to a Java class representing the robot
  • All robots (.class files) will be put into the same playground without other robots
  • There will be 1000 rounds, the winner is who wins most of them (because of statistical reasons everybody should be able to do the same and should get the same result)
  • Only one robot per language/solution submission will be used, if you have several solutions please make a note which one to use
  • But you could submit more than one language if you want, then you have more than one robots on the field, so essentially one robot per MPS project is allowed
  • The Robocode version for the contest will be the current stable version:   1.8.2.0 (Sat, 22 Jun 2013)
  • The MPS version which I use to create the robots will be MPS-3.0-EAP-129.189 – which is the current 3.0 EAP
  • Put your language under an Open Source Licence, because:
  • There is no price to win, only fame, experience and the know-how you can get by reading the code of the others
  • I will announce the winner in this blog
  • I collect all submissions on a GitHub account: https://github.com/mpsrobocodecontest
  • If you are not on GitHub and/or familiar with git – no problem, simply drop your submission by any channel (e.g. e-mail to mpsrobocodecontest – which I created for this contest – at gmail), and I will put it for you into the repository for you
  • I (Jens) myself am not allowed to participate. 😦
  • Last, but most important one: this is all about fun and learning – I don’t want to see any grumpy faces 😉

Even if your robot is not the best – you can impress the others by a cool language or solution. There is also no price for this to win 😉

I think, two month should be fine for the first round. So I’ll gather all robots at September, 14th 2013. Maybe due to some unpredictable reasons I’m not able to do the contest execution directly at that day, but I’ll do what I can. In the worst case I have to hand over to some friendly delegate – who of course also will not be allowed to put her robot into the playground.

Yes, you read ‘the first round’. I hope there will be some interest and we can repeat this. You can improve your languages and solutions based on the your own experience and what you learn from the other robots. That’s why all submissions should be Open Source.  I can imagine that further rounds will be with some limitations – if you participated at a Code Retreat or saw the film The Five Obstructions you know what I mean. That improves the skills even further. Any suggestions are welcome!

Let the games begin!

Extend Money sample with currency check

Note: this tutorial was built using MPS 2.5

MPS comes with a sample extension of baseLanguage: money. Also a screencast on jetbrains.tv can be watched. One drawback is that you can add different currencies like 3 EUR + 4 USD. That’s not exactly what an application should allow, in most cases only money of the same currency should be added or subtracted. So let’s see what we can do about this.

If you want to try it yourself, you find the money extension in the MPSSamples.2.5 directory that comes with MPS as one of the ‘sampleJavaExtensions’. Or you have followed the mentioned screencast and reproduced what the guys did there, then your code should also be suitable.

First, the MoneyType needs a reference to the CurrencyUnit obviously:

Image

Then, the type of the money literal has to honor the unit too. In the original version, a quotations is used to infer the type. The user guide says: “A quotation is a language construction that lets you easily create a node with a required structure. Of course, you can create a node using smodelLanguage and then populate it with appropriate children, properties and references, using the same smodelLanguage.” So let’s substitute the quotation with node creation by smodelLanguage and populateit with the unit:

Image

The MoneyTypeFactory does what it’s name says:

Image

Now we can make use of it and employ the unit in several checks. The operations should only be allowed for money of the same unit:

Image

There are several changes:

  • ‘is applicable’ is implemented now to allow only plus and minus expressions for money of the same currency
  • the operation type is created using one of the both operands and the factory so that the currency is copied also in the resulting type
  • left and right operand types: the quotations can be replaced by smodel node creation – that is not necessary if the MoneyType editor itself does not require the currency unit (we defined it as [0..1] cardinality), but in fact in production it should and the declaration and check for the currency unit of MoneyType itself is left for a task for the readers to complete it yourself

Because we create the operand types as new nodes we have to tweak the subtyping rules to make it work:

Image

And last but not least we can create a new Non-Typesystem rule to create a meaningful error message:

Image

Basically that’s it. Look at the result:

Image

You find the code at https://github.com/jensnerche/mps-moneywithunits. Enjoy yourself with own experiments – set curency units on Money too, implement MulExpression and DivExpression, forbid currencies with same name to mention only some.

Hint: wordpress scales the screenshots automatically so that they fit into the layout. You can click on the picture to get a readable full size version.

Let’s get started…

Hi everyone,

recently we had a discussion in the forum of Jetbrain’s MetaProgrammingSystem (MPS for its friends).
We, a bunch of users of MPS, agreed that a community of MPS users would be useful to share tips and best practices, to meet other developers with the same needs. In a few words: to share and grow together.

For this reason we started this blog, hoping to get contributions from many of you.
If you have tips, tutorials, lesson learned, or just your experience to share write to us (you could leave a comment for example) and we will discuss about how to insert your contribution.

Happy coding!